

Preserving the sanctity of your original media has always been one of the cardinal rules of production.
In my first week of film school, I learned about work print. The original film negative is used once to make this cloned copy, then the original is locked away, presumably in a climate-controlled vault environment. The work print is used for editing, with all the scratches, tears, gouges and dirt endemic to the mechanical film editing process. The pristine original negative is only brought out at the end of the process to make printing masters, then locked away again.
When I first started shooting video, one advantage it had over film was that the tapes could be erased and reused, or so I was told. But in common professional practice, this is rarely done. In these days of non-linear editing, the original tapes are used as source material when the footage is digitized into the Final Cut Pro or Avid systems, then they are vaulted, in case of problems later.
What kinds of problems? Recently I shot a corporate project on HDV, and shortly afterward the producer called me in a panic with the news that all the footage we had shot was slightly, but noticeably, out of focus — words that jab a cold spear into the heart of any shooter. “We think we can save it,” he said, but high anxiety prevailed. Even if they could save the footage, my reputation was on the line.
My camera assistant and I reviewed our procedures, discussed what might have gone wrong, and made plans to take out the same camera and shoot a test. The problem was especially puzzling because at least half a dozen people had scrutinized video monitors during our shoot, and our images seemed fine at the time.
Days later, the producer called to say they owed me an apology. “The editor noticed that the color bars were also out of focus,” she told me, indicating that the footage had been digitized incorrectly.
“You mean no one checked the original tapes?” I asked incredulously. They had pushed the panic button, based on how the images looked after they were digitized. When they went back and checked the tapes, everything looked fine. But what if the tapes had been erased or destroyed?
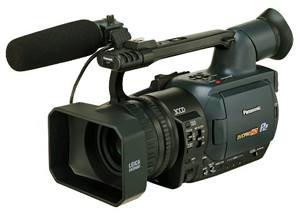
Now there is a new challenge to the conventional sanctity of the original recording medium. The Panasonic HVX200 camcorder (as well as its big brother, the HPX500, and some newer cameras as well) record in a variety of standard-definition and high-definition formats on P2 cards, a proprietary technology based on the PCMCIA card form factor. Revolutionary, file-based recordings made on these solid-state, static flash media can be transferred to a hard drive, either through the built-in PC card slot available on many computers or through Panasonic’s 60 GB Portable Hard Drive Storage Device, the P2 Store. When the HVX200 was first released in early 2006, the only cards available were 4 GB. Since then, Panasonic has come out with 8 GB cards, and then 16 GB and 32 GB cards.
Recording times vary with the video format. A 16 GB card can hold as much as 64 minutes of DVCPRO/DV recording, or as little as 16 minutes of DVCPRO HD footage. The cards are rugged and the HVX200 provides two card slots (four on the HPX500) so a fully used card can be swapped out while recording continuously on the other card.
But … (remember Pee Wee Herman said, “There’s always a big but”) there’s a catch. The cards are ridiculously expensive. The 4 GB and 8 GB sizes have been discontinued, but the 16 GB cards cost $900 each and the 32 GB cards a whopping 1550! Granted, the camera can also record on DV tapes, but only in DV mode, not in the higher-resolution formats. Panasonic also makes an accessory 100 GB hard drive for direct recording called the Fire Store, but this outboard device limits the portability of the HVX200, one of its best features.
The result is that in most cases, the P2 cards are rented or borrowed with the camera. After recording, the images and sound are transferred to a hard drive, then the cards are erased, often within minutes of recording! So much for the sanctity of the original material.
On a big crew shooting a lot of footage, this process is often accomplished in the field by an assistant (usually one of the lowest paid people on the crew) who dumps the files to a hard drive, often under time pressure, erases the card, and quickly returns it to one of the camera’s slots for re-use. On multicamera productions, this process is accelerated.
On a small crew, even with numerous cards, the file transfer is often done at night, after the production day. If the crew is on the road, the transfer happens back at the hotel, and if there’s a lot of footage, says DP John Chater of Berkeley, California, “Someone’s not going to dinner.” His rental company, Chater Camera, has two HVX200s and two HPX500s, as well as a couple dozen 8 GB and 16 GB cards. They never erase the P2 cards coming back from shoots until the cards are slated to go out on another rental, and several times someone has called to get the cards back a day or two later, because of a transfer problem or a corrupted file.
For a January 2008 shoot in Tokyo, we rented an HVX200, along with six 16 GB cards for several days of B-roll filming on a corporate job. Each night, producer Larry Lauter and I sat in my hotel room for an hour or more while I transferred our footage from the P2 cards to two redundant portable FireWire drives. ‘Hard drives fail often,” cautions Chater. “Redundancy is important, since you are erasing your original material.”
There are several methods for this process. The camera can be connected directly to a computer through the FireWire port, but this file transfer method is slow. Alternatively, as long as you have a PC slot and Panasonic’s free P2 driver on your computer, the simplest way is to take the original MXF files and drag them to the hard drive. But how can you verify the files before erasing the cards? Most computers can’t play these files unless they have P2 Log Pro, a $199 software package from Imagine Products, Inc. (http://www.imagineproducts.com/P2log.htm).
Another method is to import the original files directly into Final Cut Pro as uncompressed Quicktime files. Choose Import from the File menu, then Panasonic P2. If the Sequence Preset and the Capture Preset are the same, you should be able to drag the individual files into the FCP timeline and play them from there. But this method has a pitfall — you are capturing Quicktime files derived from your original material, not the original material itself.
Every time the camera starts and stops, it creates a new file. In our three days of B-roll shooting, for a little under three hours of material, we had hundreds of separate files and had to rely on spotchecking. There was no way to check each one, or certainly no one would ever have gone to dinner.
For safety, we used both methods, importing all the material as Quicktime files through Final Cut, and dragging the original MXF files to the hard drives as well. The drive I brought was 120 GB, but we ran out of space before we could add all the MXF files from our last day. Fortunately, Larry’s hard drive was 160 GB, so we could save everything.
I had enough P2 cards for the whole shoot, thus saving myself the trauma of destroying our original. We returned the cards to Ark Camera in Tokyo with all our footage still intact. As I write this while flying back across the Pacific to San Francisco, I’m sure the rental company has already erased them, but I just couldn’t do it.
What’s the answer? Well, my first computer, a Mac Plus I bought in 1986, came with a $1000, 20 Megabyte external hard drive (“more than you’ll ever need,” said the salesman at that time). That’s $50 per Megabyte. Last week I bought my 120 GB portable FireWire drive (with 6000 times the amount of storage) for $150, a little over $1 per Gigabyte.
If Panasonic ever brings the price of the P2 cards down to a reasonable level, like $50-100, producers would simply buy them new for each shoot. Then we won’t have to erase the cards and risk that our original footage could be living in oblivion.
Originally published in StudentFilmmakers Magazine, February 2008


Pingback: Around the World in 11 Days: Part 2 — Roving Camera: Bill Zarchy's Blog